Scanning for Bluetooth devices with React Native
I've been building iOS applications for 2 years now. Although I'm not a big fan of the development environment, Xcode has its quirks, I do love the iOS platform. The biggest drawback is that you can only target iOS devices. I heard a lot of things, some good, some bad about Xamarin and React Native and was intrigued by both hybrid app development platforms. I'm a little familiar with Xamarin but have no experience with React or React Native. Motivated with the learning goals I've set out for myself I decided to give React Native a test drive in one of the Aaltra company hackathons. It's a half day every week that we use to test out new technologies and learn new things.
The examples you can find on the internet of these cross-platform technologies are most of the time quite straightforward. A CRUD application which calls an API to save the data to the database. At Aaltra the applications we build are most of the time more advanced. Sometimes they need to communicate over TCP sockets, sometimes we need to call Bluetooth devices, the list goes on. We wanted to test if React Native was a good fit for these use cases. This is more than just data entry and has to use some of the native API's of the different platforms in order to work. I decided to build a Bluetooth Scanner for iOS. The app is as simple as it is brilliant, no sarcasm there, it will scan for available Bluetooth devices.
So I'm assuming you've got React Native installed, if that's not the case you can check out the getting started guide. After installing the necessary tools, create a new project:
react-native init BluetoothScanner
We'll start by getting a basic UI up and running. The devices that were found while scanning are put in a ListView, there will also be some text and a button to start the scanning. Later in this post I'll explain why the button is necessary. Here's the code of the index.ios.js file:
import React, { Component } from 'react';
import {
    AppRegistry,
    ListView,
    View,
    Text,
    Button } from 'react-native';

class BluetoothScanner extends Component {
    constructor(props){
        super(props);

        const dataSource = new ListView.DataSource({rowHasChanged: (r1, r2) => r1 !== r2});
        this.state = {
            dataSource: dataSource.cloneWithRows(['row 1', 'row 2', 'row 3', 'row 4', 'row 5', 'row 6', 'row 7', 'row 8'])
        };
    }

    startScanning() {
        console.log('start scanning');
    }

    render() {
        return (
            <View style={{padding: 50 }}>
                <Text>Bluetooth scanner</Text>
                <Button onPress={() => this.startScanning()} title="Start scanning"/>

                <ListView
                    dataSource={this.state.dataSource}
                    renderRow={(rowData) => <Text>{rowData}</Text>}
                />
            </View>
        );
    }
}

AppRegistry.registerComponent('BluetoothScanner', () => BluetoothScanner);
To run the app on iOS, run the following command in the folder where the react-native app was initialized:
react-native run-ios
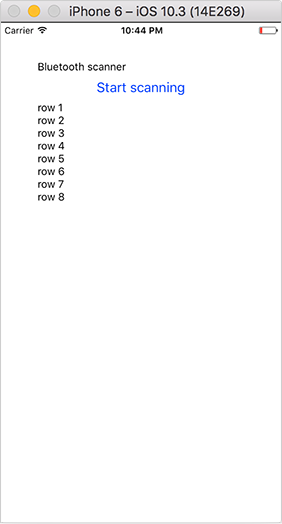
The simulator should look like this:

Now that we have a basic application we need an external library that allows us to use the corresponding native API depending on the platform the application is running on. I settled on the React Native BLE Manager NPM package. Installation instructions can be found on the NPM page of the package, just don't forget to link the native library after installing it. To link on iOS run the following command after installing:
react-native link react-native-ble-manager
The package is installed, let's use it. First add the correct ìmport statement at the top of the file.
import BleManager from 'react-native-ble-manager';
We'll be handling an event that the ble-manager emits every time it finds a bluetooth device. We can use the componentDidMount event of our React Native component to initiliaze the necessary classes. componentDidMount is a good place to do this according to the React Native documentation:
componentDidMount() is invoked immediately after a component is mounted. Initialization that requires DOM nodes should go here. If you need to load data from a remote endpoint, this is a good place to instantiate the network request. Setting state in this method will trigger a re-rendering.
You can read more about the Component Lifecycle in the React Native documentation. To handle the event the React Native NativeAppEventEmitter class is used, this is imported as well. The componentDidMount function handles the setup:
componentDidMount() {
    console.log('bluetooth scanner mounted');

    NativeAppEventEmitter.addListener('BleManagerDiscoverPeripheral',(data) =>
    {
        let device = 'device found: ' + data.name + '(' + data.id + ')';

        if(this.devices.indexOf(device) == -1) {
            this.devices.push(device);
        }

        let newState = this.state;
        newState.dataSource = newState.dataSource.cloneWithRows(this.devices);
        this.setState(newState);
    });

    BleManager.start({showAlert: false})
              .then(() => {
                        // Success code
                        console.log('Module initialized');
                        BleManager.scan([], 120);
                        });

}
First a listener is added to the event the ble-manager sends out whenever it finds a bluetooth device. If a device is found, an entry is added to the array which is then set to the dataSource that feeds the ListView. The state of the component is set every time a device is found to refresh the ListView in the UI. At the end of the function ble-manager is started and a scan is launched.
To see the Bluetooth scanner in action we can't use the simulator. It never discovers any Bluetooth devices, I'm guessing this is because the simulator does not have access to the Bluetooth radio of the computer it runs on. If you want to run your application on a physical iOS device, look into the folder structure of the app and you'll notice there is an ios folder. In it there is an Xcode project file with the name of the application, in this case BluetoothScanner. You can open this file in Xcode just like a normal native iOS project. Choose the device you want to run it on and hit Build.
Any errors or console.log statements that occur in the application will be send to the Console in Xcode. Unfortunately an error occurs when the componentDidMount function is called:
2017-05-30 21:57:35.209333+0200 BluetoothScanner[932:266360] [CoreBluetooth] API MISUSE: <CBCentralManager: 0x17086d180> can only accept this command while in the powered on state
I'm assuming you have to wait until the Bluetooth radio on the iOS device is ready. There is probably another event in the Component Lifecycle that can be used but I worked around this problem by adding a button to the UI and start scanning when the button is pressed. This is the full code for the Bluetoothscanner app:
import React, { Component } from 'react';
import {
    AppRegistry,
    ListView,
    NativeAppEventEmitter,
    View,
    Text,
    Button } from 'react-native';
import BleManager from 'react-native-ble-manager';

class BluetoothScanner extends Component {
    constructor(props){
        super(props);

        const dataSource = new ListView.DataSource({rowHasChanged: (r1, r2) => r1 !== r2});
        this.devices = [];
        this.state = {
            dataSource: dataSource.cloneWithRows(this.devices)
        };
    }

    componentDidMount() {
        console.log('bluetooth scanner mounted');

        NativeAppEventEmitter.addListener('BleManagerDiscoverPeripheral',(data) =>
        {
            let device = 'device found: ' + data.name + '(' + data.id + ')';

            if(this.devices.indexOf(device) == -1) {
                this.devices.push(device);
            }

            let newState = this.state;
            newState.dataSource = newState.dataSource.cloneWithRows(this.devices);
            this.setState(newState);
        });

        BleManager.start({showAlert: false})
                  .then(() => {
                            // Success code
                            console.log('Module initialized');
                            });
    }

    startScanning() {
       console.log('start scanning');
       BleManager.scan([], 120);
    }

    render() {
        return (
            <View style={{padding: 50 }}>
                <Text>Bluetooth scanner</Text>
                <Button onPress={() => this.startScanning()} title="Start scanning"/>

                <ListView
                    dataSource={this.state.dataSource}
                    renderRow={(rowData) => <Text>{rowData}</Text>}
                />
            </View>
        );
    }
}

AppRegistry.registerComponent('BluetoothScanner', () => BluetoothScanner);
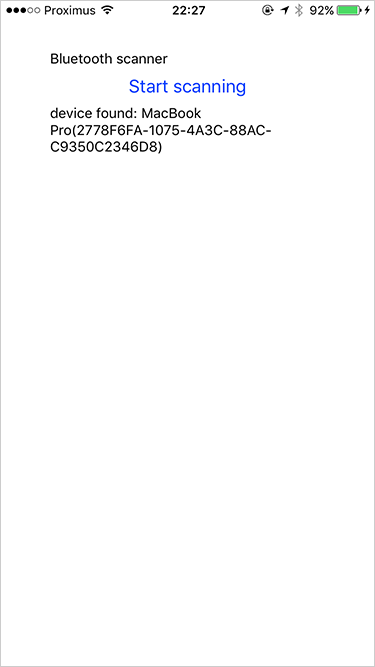
And this is a screenshot of the app in action, as you can see it has found my laptop:
I like React Native and it is clear that you can call onto the hardware parts of the platform that you are targeting. Which I was afraid would not be possible or would be difficult. The next step will probably be testing this out on Android. But I currently do not have an Android device and I had to install a bunch of tools to run the app, that'll be for another time.
What I did notice while working with the React native toolset is that it is still quite yound and that it needs to mature further. But I'll be watching it in the future and if I have a use case will certainly use it.
