Creating an iOS 14 widget showing health data
With iOS 14 Apple introduced a neat new feature: widgets. I've been running the beta for some weeks now and love them. So let's see how hard it is to create one ourself.
Let's start with a little disclaimer: This article and the code with it was written using iOS 14 beta 2 and Xcode 12 beta 2. There is no guarantee that it will work in future versions.
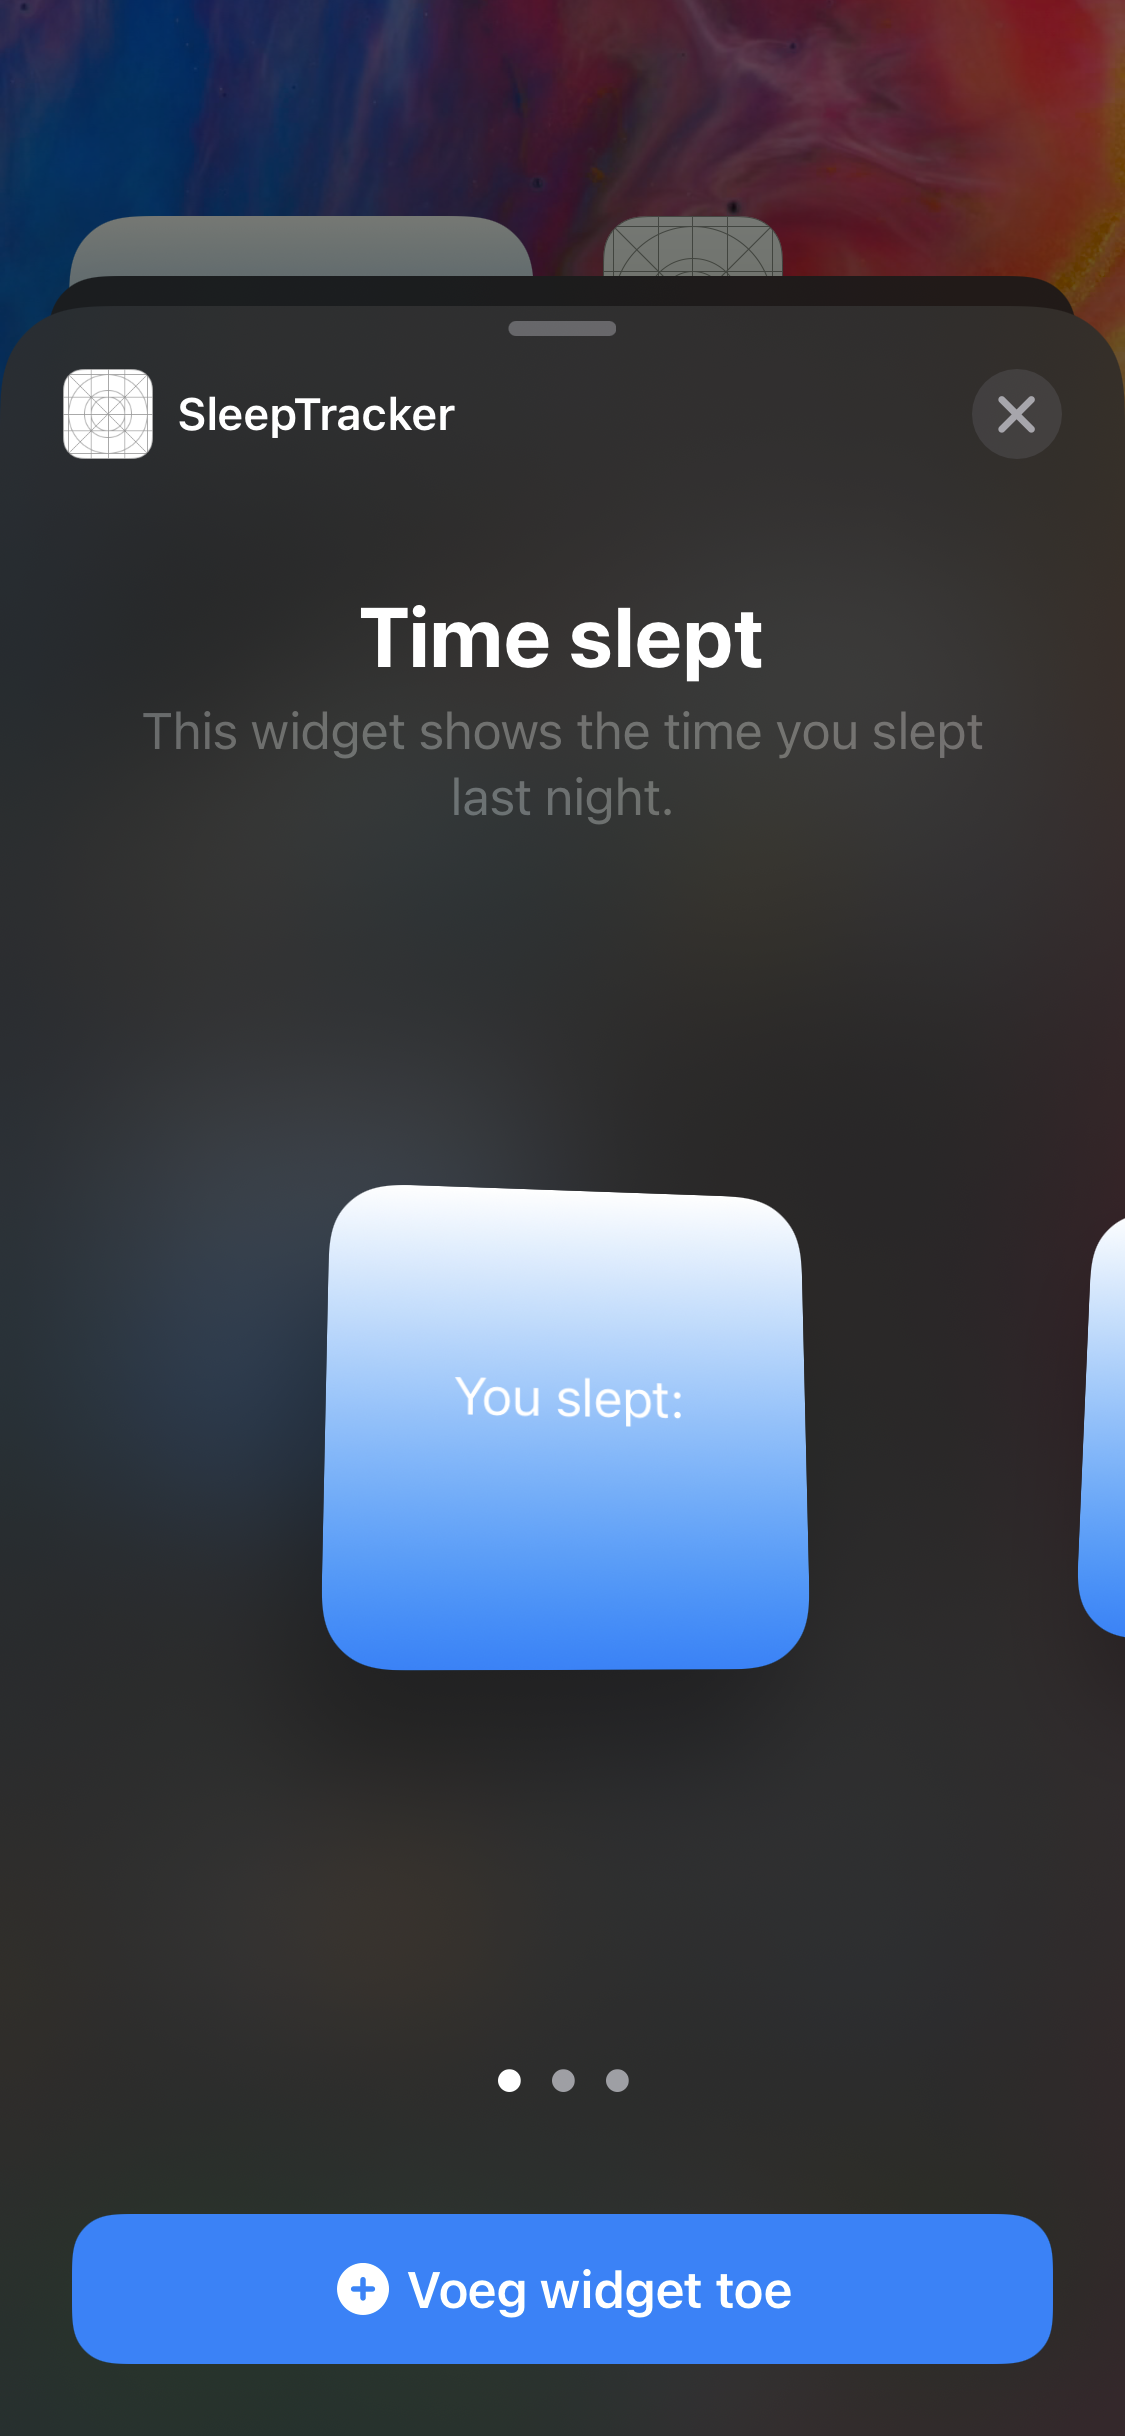
Via the health app in iOS you can track your sleep with either your iPhone or your Apple Watch. I thought it would be neat to have a widget which shows the time you slept last night. Let's look at the end result:

The first thing you need to know when developing a widget: your widget won't work if the code you are using in your widget is not being called in the app itself as well. At first I struggled with this. If your widget contains code that is not called by the app, it won't work. With this in mind let's first develop the main app and once it's finished we can reuse part of its code to create a widget for it.
Configuring HealthKit
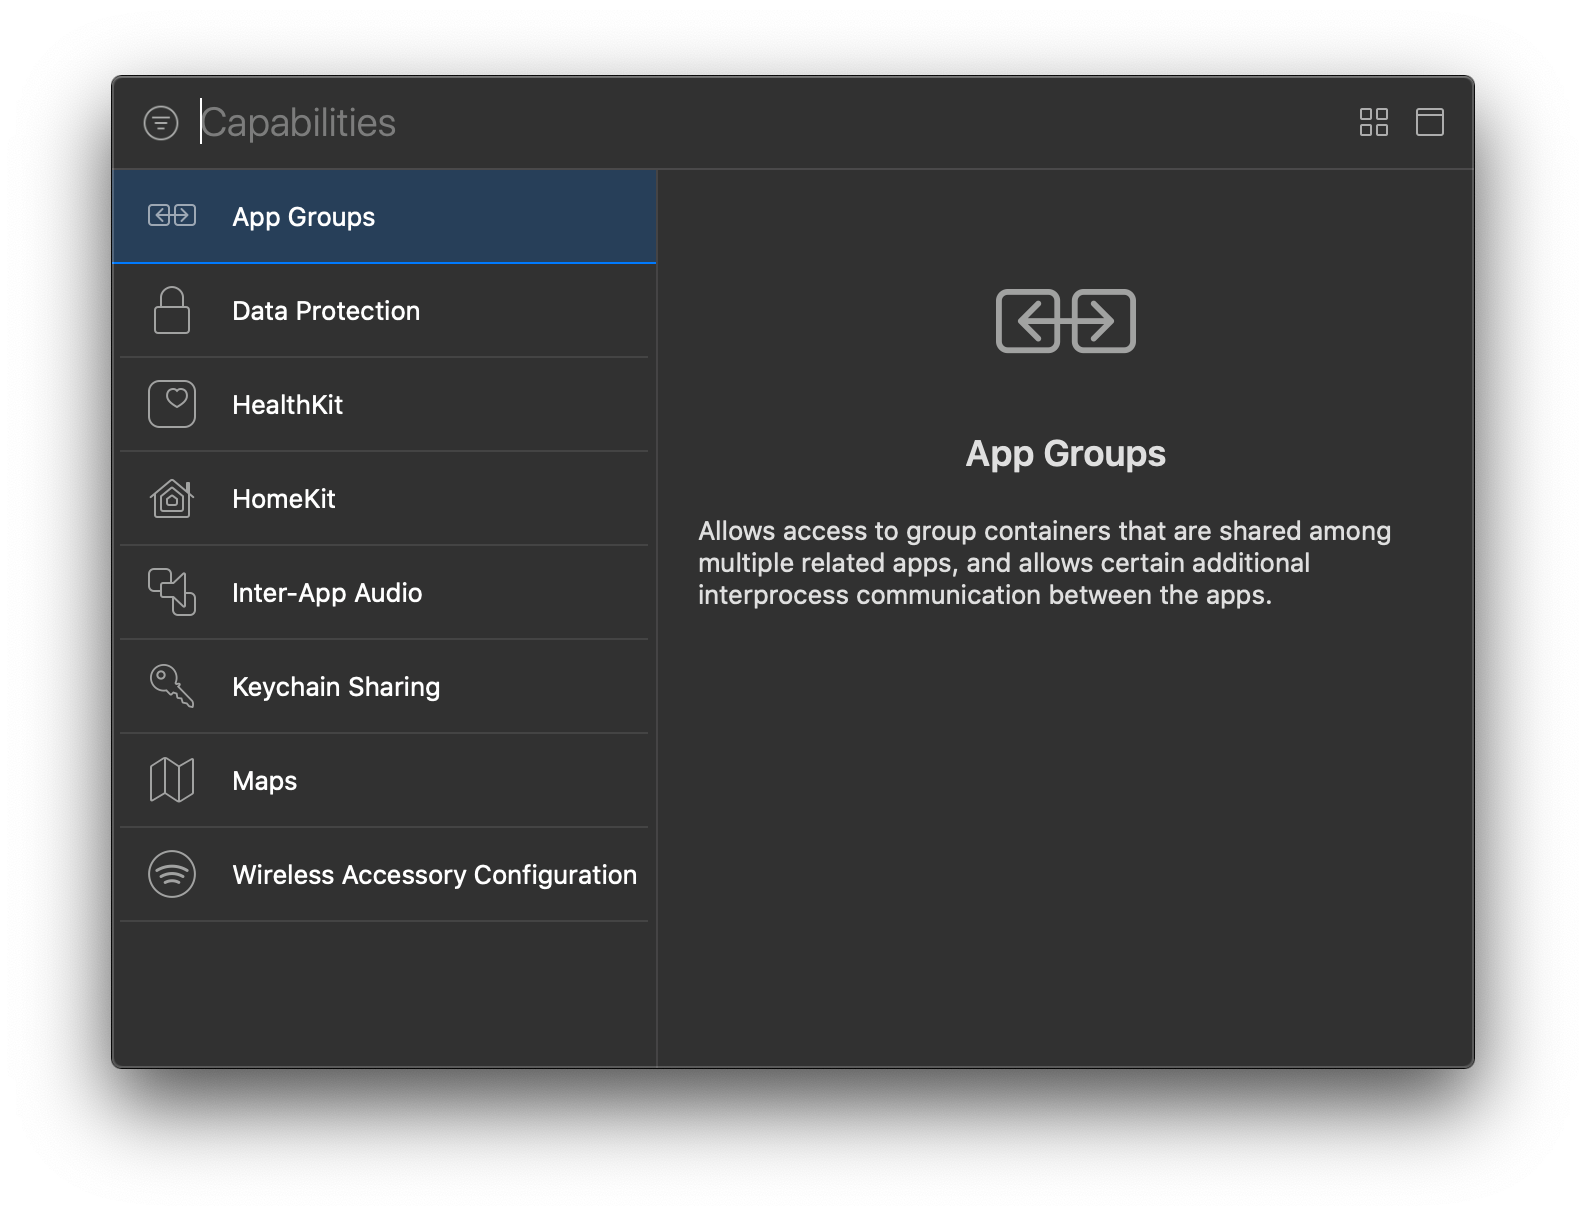
First some setup needs to be done. The app needs permission to query data from the iOS Health app. In the Project navigator, select the top most item in the list and open the Signing & Capabilities tab. Add a capability by clicking on the + Capability button on the top left. In the popup that follows select the HealthKit capability.
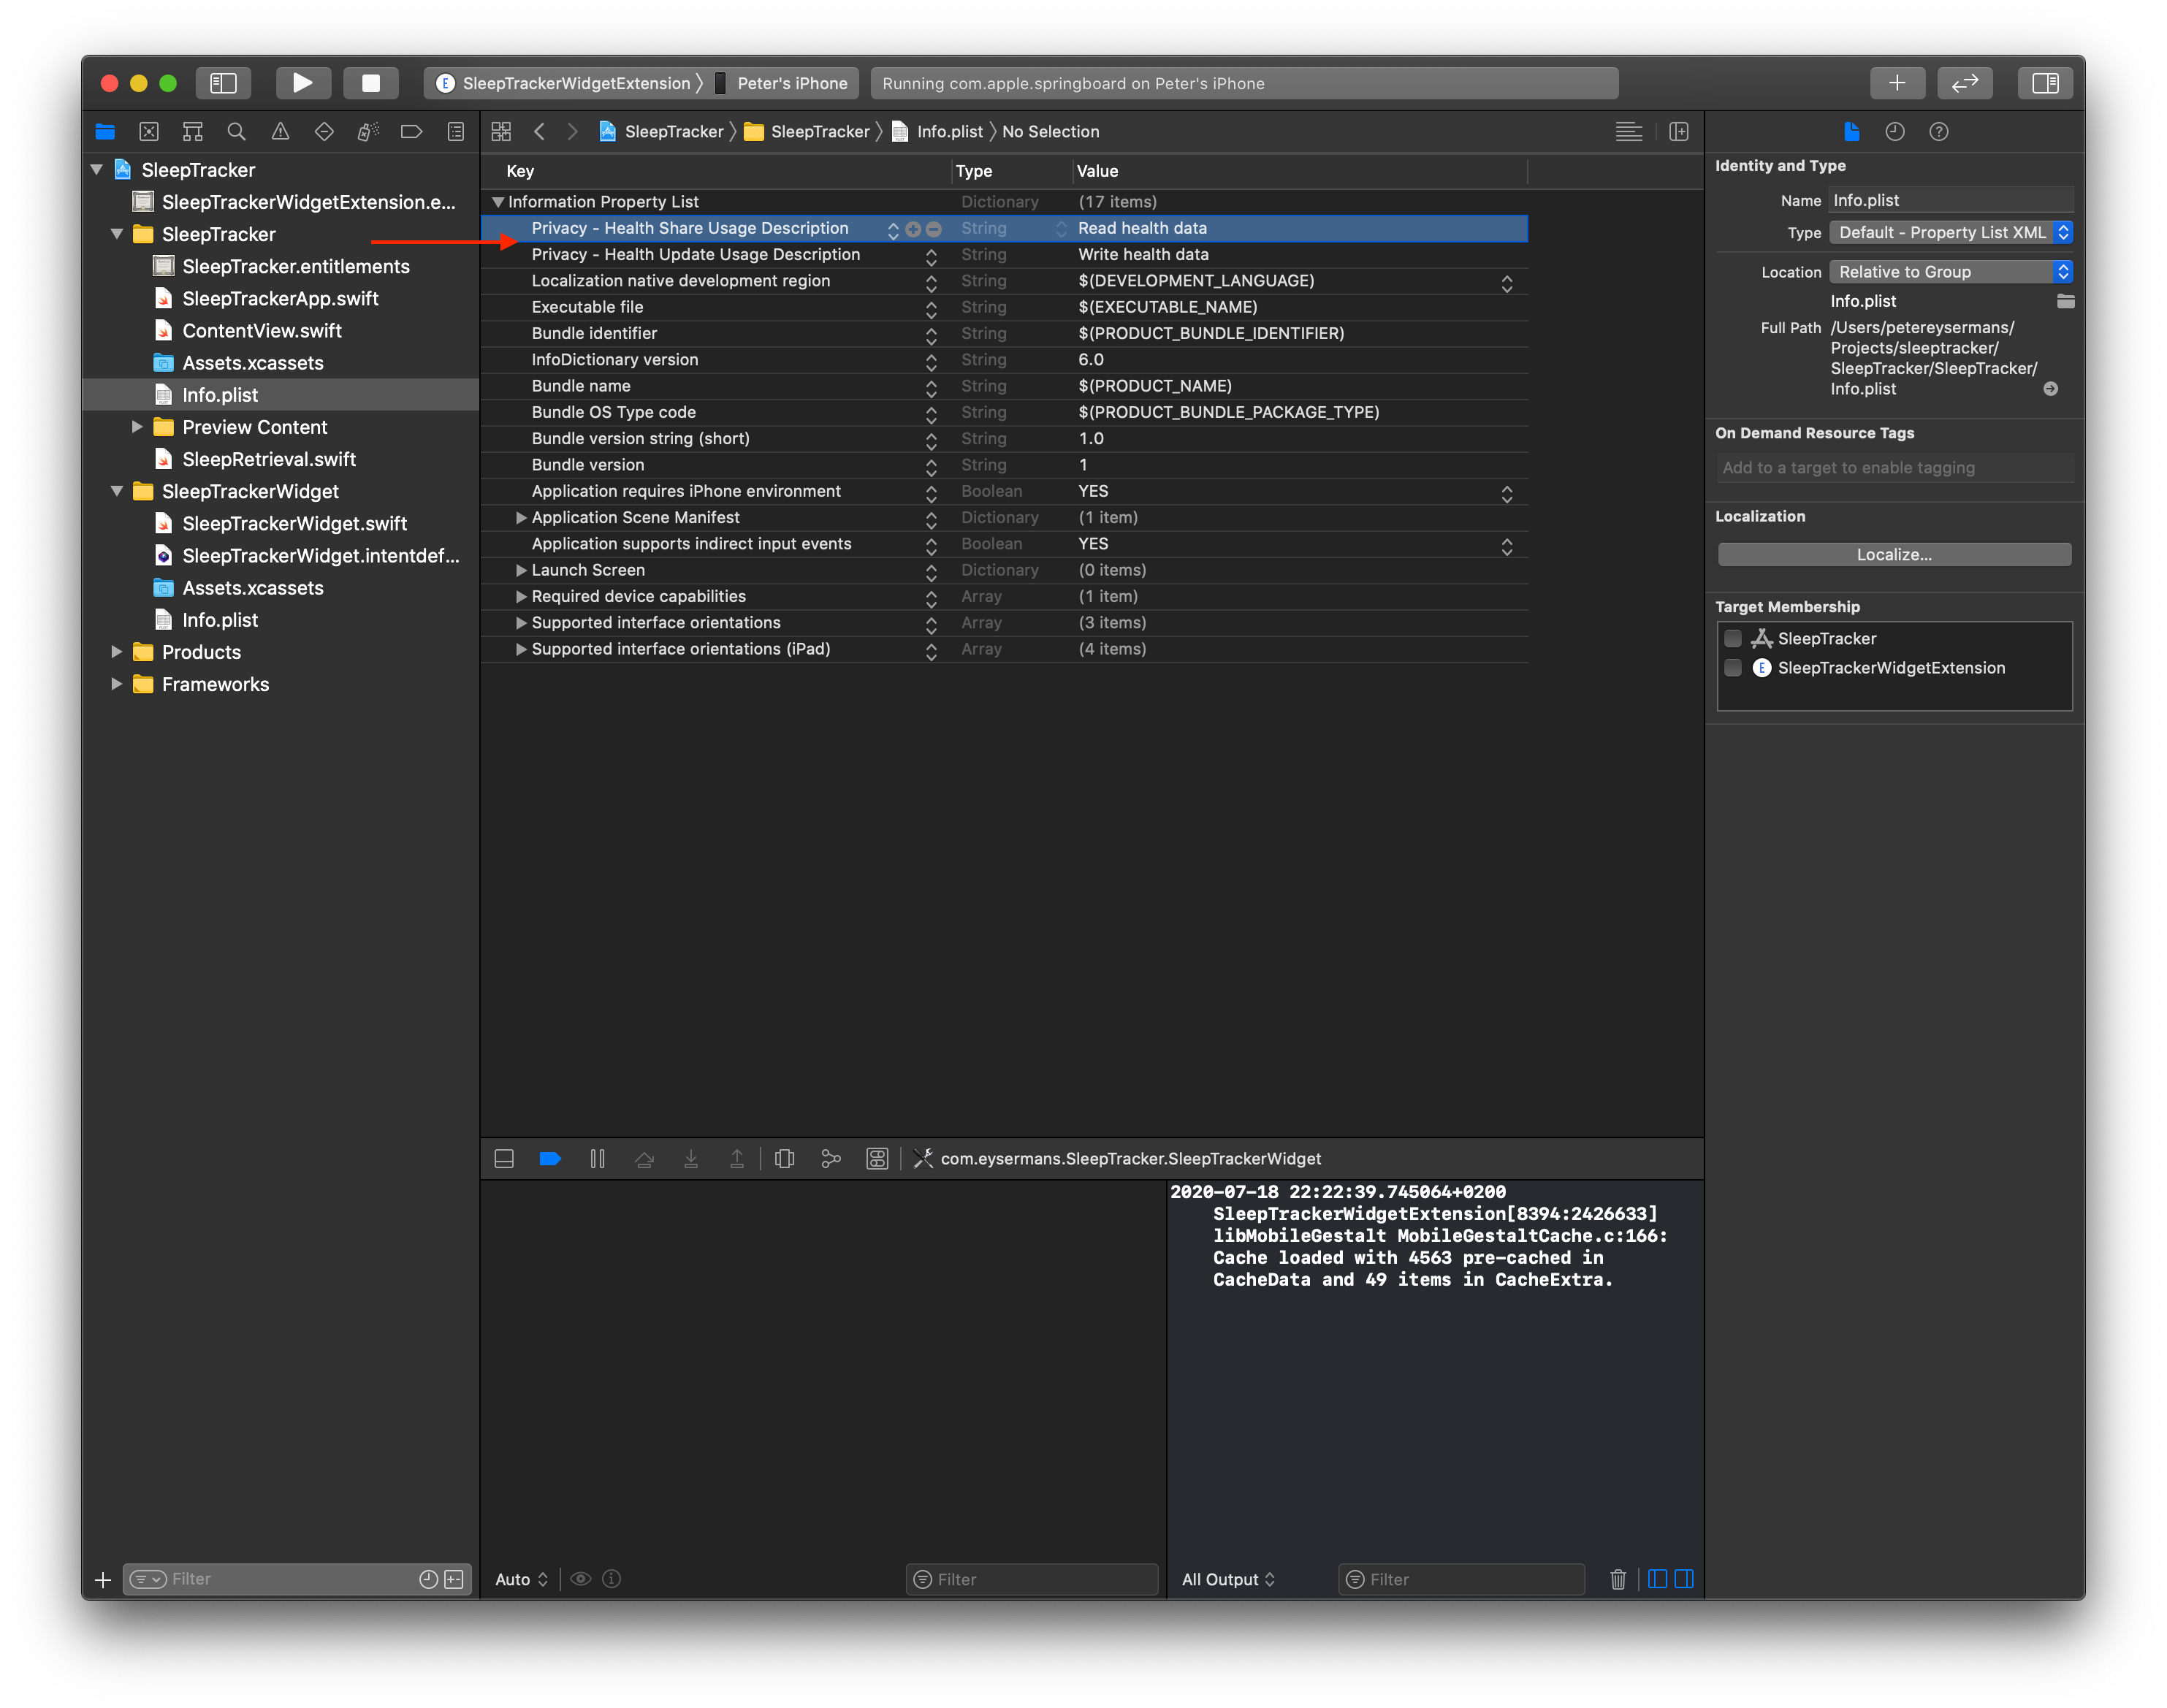
Next to this capability we also need to add two rows to the Info.plist file to explain to the user what will happen with the data. Open the file and add these two rows to it:
- Privacy - Health Share Usage Description
- Privacy - Health Update Usage Description
Give a description what your app will be doing with the data.
Fetching sleep data
Now the app is all set up to read the necessary data from the Health app. To fetch this data a helper class is created, this helper class will be reused when the widget is created. The code to retrieve the sleep data is based on code from this article: Using Sleep Analysis in HealthKit with Swift.
To interact with the Health app HealthKit is imported and the HealthKit HKHealthStore class is used. Before data can be read, the app needs authorisation to query data:
func retrieveSleepWithAuth(completion: @escaping (String) -> ()) {

        let typestoRead = Set([
            HKObjectType.categoryType(forIdentifier: HKCategoryTypeIdentifier.sleepAnalysis)!
        ])

        let typestoShare = Set([
            HKObjectType.categoryType(forIdentifier: HKCategoryTypeIdentifier.sleepAnalysis)!
        ])

        healthStore.requestAuthorization(toShare: typestoShare, read: typestoRead) { (success, error) -> Void in
            if success == false {
                NSLog(" Display not allowed")
            } else {
                self.retrieveSleep(completion: completion)
            }
        }
    }
This function doesn't need much explanation, the type of data the app will save and read are passed to the healthStore via the requestAuthorization function.
Once the authorisation has been approved, the sleep data can be fetched. Because the app only shows the data from last night, the data is filtered using a predicate.
let startDate = Calendar.current.date(byAdding: .day, value: -1, to: Date())
let endDate = Date()

let predicate = HKQuery.predicateForSamples(withStart: startDate, end: endDate, options: HKQueryOptions.strictEndDate)
As you can see the predicate filters all data from yesterday until today. Now that there is a predicate, we can query the healthStore to get the necessary data.
if let sleepType = HKObjectType.categoryType(forIdentifier: HKCategoryTypeIdentifier.sleepAnalysis) {
	 let sortDescriptor = NSSortDescriptor(key: HKSampleSortIdentifierEndDate, ascending: false)

	 let query = HKSampleQuery(sampleType: sleepType, predicate: predicate, limit: 200, sortDescriptors: [sortDescriptor]) { (query, tmpResult, error) -> Void in

	 }

healthStore.execute(query)
A few things are happening in this block of code. The sleepType variable indicates the type of data that is fetched, the sortDescriptor describes how the data should be sorted. In this case the newest data is on top. At last a query object is created using the type, predicate and sort descriptor. It has a closure where the fetched data can be processed. This query is passed to the healthStore instance and that's it.
In the closure the number of seconds between the start and end of each sleep session is calculated and the total number of seconds is converted to a readable format: 7h 30m 4s. This is the query object including the closure for the sake of being complete:
let query = HKSampleQuery(sampleType: sleepType, predicate: predicate, limit: 200, sortDescriptors: [sortDescriptor]) { (query, tmpResult, error) -> Void in

	  if error != nil {
	      return
	  }

	  var totalSeconds : Double = 0

	  if let result = tmpResult {
	      for item in result {
	          if let sample = item as? HKCategorySample {

	              let timeInterval = sample.endDate.timeIntervalSince(sample.startDate)

	              totalSeconds = totalSeconds + timeInterval
	          }
	      }
	  }

	  let result =
	      String(Int(totalSeconds / 3600)) + "h " +
	      String(Int(totalSeconds.truncatingRemainder(dividingBy: 3600) / 60)) + "m " +
	      String(Int(totalSeconds.truncatingRemainder(dividingBy: 3600)
	                  .truncatingRemainder(dividingBy: 60))) + "s"
	}
Showing sleep data
Now that the necessary data is fetched, it can be shown in the UI. This ObservableObject will be used to drive the UI. It has a mainText property in which the fetched sleep data is filled out.
class SleepModel : ObservableObject {
    @Published var mainText : String = "Getting your sleep time from yesterday"

    let sleepRetrieval = SleepRetrieval()

    func retrieveSleep() {
        sleepRetrieval.retrieveSleepWithAuth() { result -> Void in
            DispatchQueue.main.async {
                self.mainText = result
            }
        }
    }
}
And this is the SwiftUI view to show the data:
struct ContentView: View {
    @ObservedObject var viewModel : SleepModel

    var body: some View {

        VStack(alignment: .center, spacing: 0) {
            Text("Last night you slept: ")
			// show the text from the SleepModel in the UI
            Text(viewModel.mainText)
                .padding()
				// when the text appears call the SleepModel to fetch the necessary data
                .onAppear {
                    viewModel.retrieveSleep()
                }
        }
        .frame(minWidth: 0, maxWidth: .infinity, minHeight: 0, maxHeight: .infinity)
        .padding()
        .background(LinearGradient(gradient: Gradient(colors: [.white, .blue]), startPoint: .top, endPoint: .bottom))
		// stretch the gradient from top to bottom, ignoring the safe area
        .edgesIgnoringSafeArea(.all)


    }
}
Running the app, this is the result:

Widget
Now that the basic functionality has been implemented in the app, let's create a widget for it. This allows the user to see how much he has slept last night without having to open the app itself. To create a widget for an app, add a new target to the project in Xcode via File > New > Target.... In the popup select Widget extension.
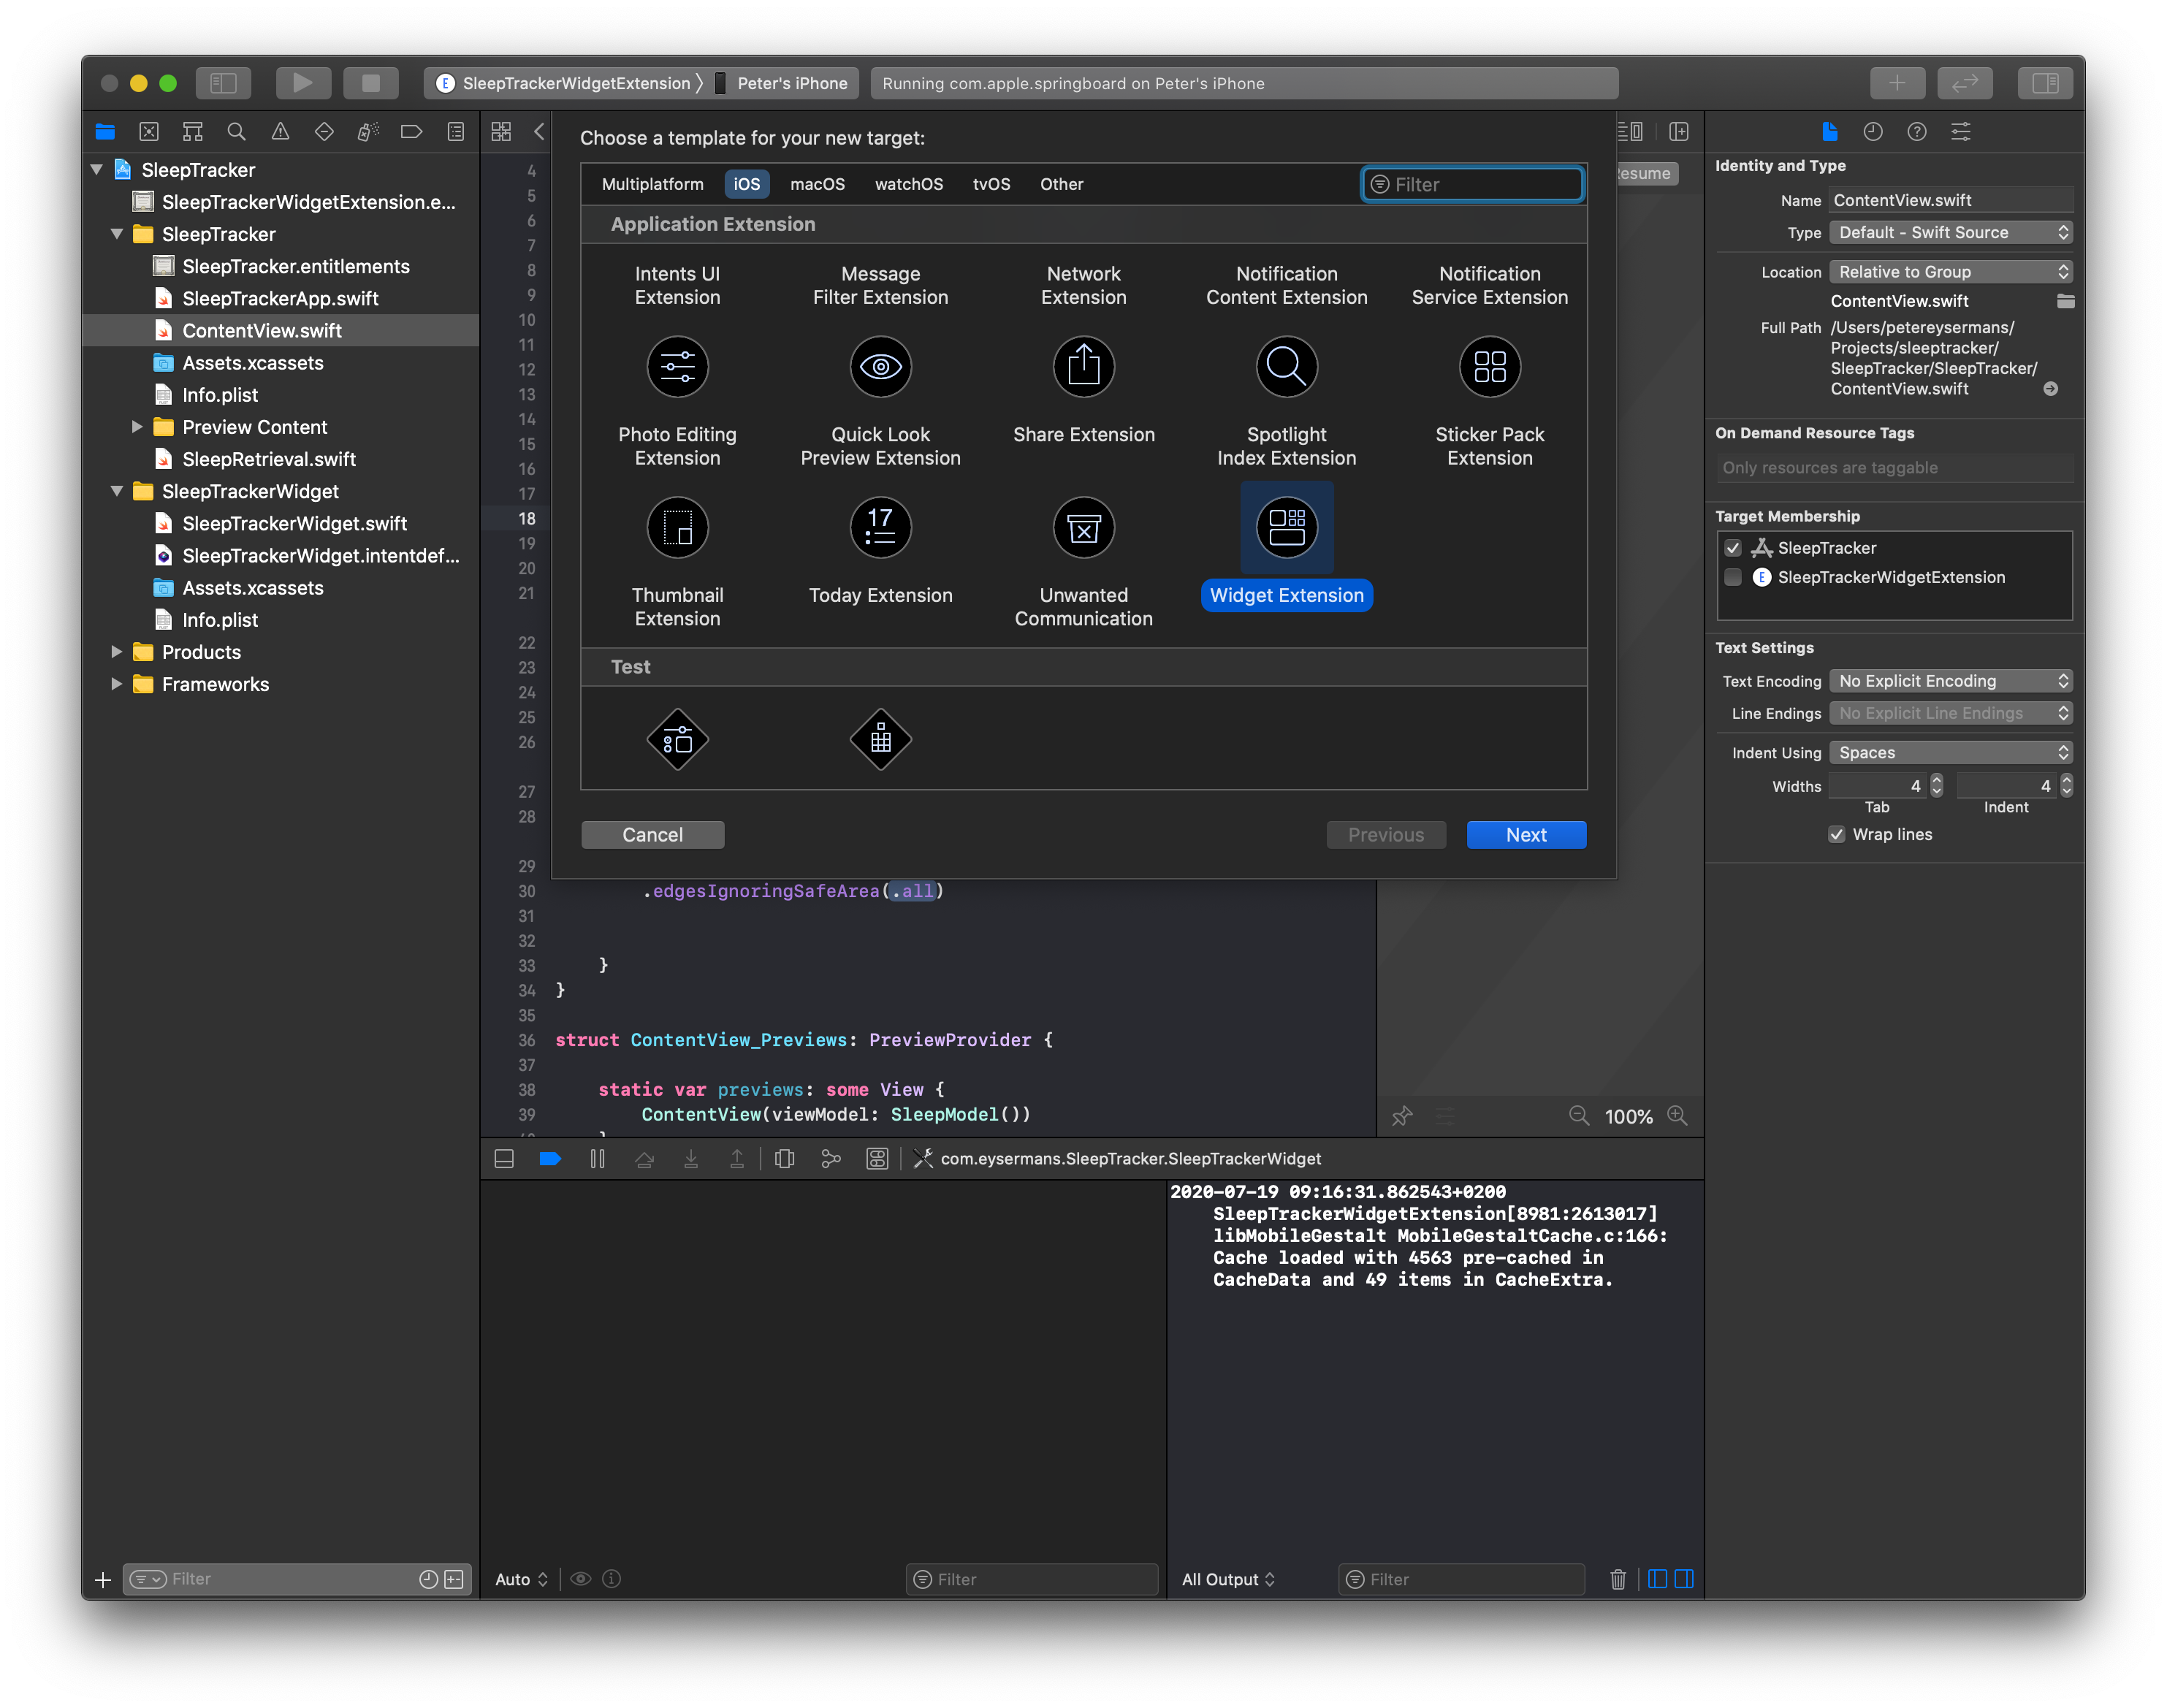
Go to the next window, give the widget a name and uncheck the Include Configuration Intent. This checkbox is intended if the widget has certain properties than can be configured by the user and is out of scope for this little project. When finishing the wizard there should be a new folder in the Project navigator in Xcode with the name of the widget you have chosen. In there Xcode has generate several files to create the widget.
This widget has its own plist file. The first thing that needs to happen, in order to allow the widget to read data from the Health app, is to add the necessary rows to the Info.plist file of the widget similar to what has been done for the app itself.
The class where it all starts is the one annotated with the @main. That is the starting point for the widget.
@main
struct SleepTrackerWidget: Widget {
    private let kind: String = "SleepTrackerWidget"

    public var body: some WidgetConfiguration {
        StaticConfiguration(kind: kind, provider: SleepTimeline(), placeholder: PlaceholderView()) { entry in
            SleepTrackerWidgetEntryView(entry: entry)
        }
        .configurationDisplayName("Time slept")
        .description("This widget shows the time you slept last night.")
    }
}
The widget uses a StaticConfiguration because the widget has no user configurable options. To this instance a TimelineProvider, a PlaceholderView and a closure with an entry instance that has the necessary data for the widget to display are passed.
The configurationDisplayName and the description are shown when the user is configuring his homescreen.
Let's have a look at the TimelineProvider. The class provides two methods that need to be overriden. The snapshot method is called by WidgetKit whenever the widget is in a transient state. For example when it appears in the widget gallery. Some sample data can be provided to give the user an idea of what the widget does an how it looks.
The timeline method is where it happens. This will be called by WidgetKit every time the widget needs to be updated. The time the widget needs to be updated is controlled by the refreshDate that is passed to the Timeline instance. This code tells WidgetKit to update the widget every day. It does not guarantee that the widget will be updated at that moment. iOS still decides itself when it updates the widget and takes other parameters into account, for example if the widget is currently not on the screen it could decide to wait with updating the widget. The helper class to retrieve the sleep is used and in the closure an entry is created and passed to the completion closure.
struct SleepTimeline: TimelineProvider {
    public func snapshot(with context: Context, completion: @escaping (SleepEntry) -> ()) {
        let entry = SleepEntry(date: Date(), value: "")
        completion(entry)
    }

    public func timeline( with context: Context, completion: @escaping (Timeline<Entry>) -> ()) {
        let currentDate = Date()
        let refreshDate = Calendar.current.date(byAdding: .day, value: 1, to: currentDate)!

        SleepRetrieval().retrieveSleep { result in

            let entry = SleepEntry(date: currentDate, value: result)

            let timeline = Timeline(entries: [ entry ], policy: .after(refreshDate))
            completion(timeline)
        }
    }
}
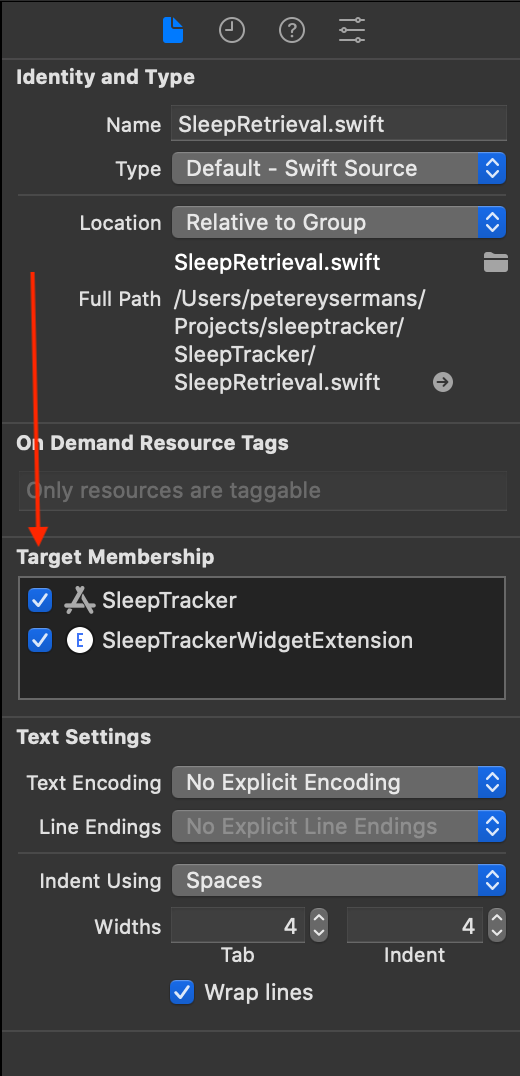
To be able to use the helper class, don't forget to check the widget extension in the Target Membership in Xcode.
Another important notice is that compared to the app itself this code will not ask permission to access the data of the Health app. This is because the widget cannot show the permission dialog. The error below is thrown when the widget tries to ask permission. More information can be found in this thread on the Apple developer forums.
2020-07-19 10:02:27.315405+0200 SleepTrackerWidgetExtension[9097:2633778] [auth] FAILED prompting authorization request to share (
    HKCategoryTypeIdentifierSleepAnalysis
), read (
    HKCategoryTypeIdentifierSleepAnalysis
)
2020-07-19 10:02:27.315675+0200 SleepTrackerWidgetExtension[9097:2633778]  Display not allowed
The solution is to handle the permission in the app itself and just retrieve the necessary data in the widget.
The SleepEntry class is the ViewModel which is used to pass the data to the widget.
struct SleepEntry: TimelineEntry {
    public let date: Date
    public let value: String
}
The last thing that needs to be defined is the user interface. There are two classes that are responsible for how the widget looks. The PlaceholderView is the class that is used when the widget is shown for the first time. From the Apple documentation:
It's a generic visual representation with no specific content.
The SleepTrackerWidgetEntryView is the main class that provides the user interface. It has a Timeline.Entry property which is actually an instance of the SleepEntry class, it contains the necessary data for the widget to show.
struct SleepTrackerWidgetEntryView : View {
    var entry: SleepTimeline.Entry

    var body: some View {
        VStack(alignment: .center, spacing: 4) {
            Text("You slept:")
            Text(entry.value)
        }
        .frame(minWidth: 0, maxWidth: .infinity, minHeight: 0, maxHeight: .infinity)
        .padding()
        .background(LinearGradient(gradient: Gradient(colors: [.white, .blue]), startPoint: .top, endPoint: .bottom))
    }
}
And that's it, our app now has a neat widget. Let's look at the end result one more time.
If you need the full project, the code can be found on github.