Drawing in Android, be aware of pixel density
In 2017 I started working on an Android app, at some point a custom graph was needed that could be changed by the user. Drawing the different parts on the screens gives the most flexibility. The Canvas is used for drawing, the custom component where the drawing will happen is a class which inherits from View.
public class CustomComponent extends View {

    public CustomComponent(Context context) {
        super(context);
    }

    public CustomComponent(Context context, @Nullable AttributeSet attrs) {
        super(context, attrs);
    }

    public CustomComponent(Context context, @Nullable AttributeSet attrs, int defStyleAttr) {
        super(context, attrs, defStyleAttr);
    }
}
This class can already be used in the layout file, but it won't do much. This is how the layout file looks after adding the custom component to it:
<?xml version="1.0" encoding="utf-8"?>
<LinearLayout xmlns:android="http://schemas.android.com/apk/res/android"
    xmlns:app="http://schemas.android.com/apk/res-auto"
    xmlns:tools="http://schemas.android.com/tools"
    android:layout_width="match_parent"
    android:layout_height="match_parent"
    android:orientation="vertical"
    tools:context="com.eysermans.customcomponent.activities.MainActivity">

    <com.eysermans.customcomponent.components.CustomComponent
        android:background="@android:color/holo_red_dark"
        android:layout_width="200dp"
        android:layout_height="200dp" />

</LinearLayout>
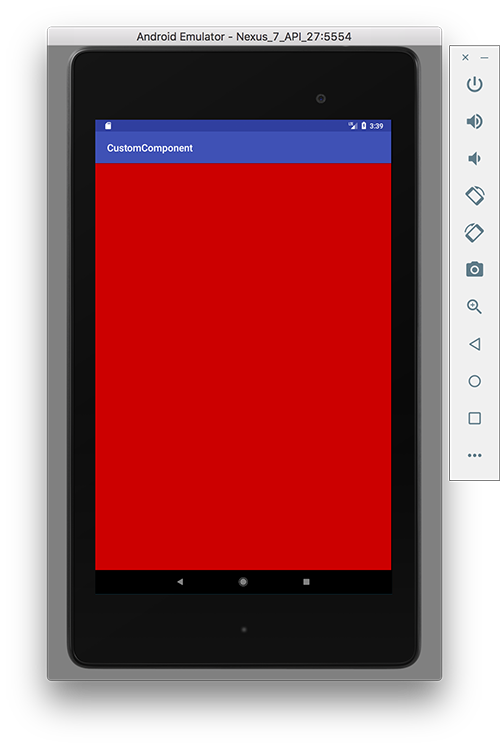
And this is how it looks in the simulator, the custom component currently has a red background and spans the entire screen.
It's quite easy now to start drawing, overriding the onDraw method of the View baseclass will provide a Canvas instance which has all sorts of draw methods. Let's start simple with drawing a line on the canvas, the drawLine method does this.
@Override
protected void onDraw(Canvas canvas) {
    Paint paint = new Paint();
    paint.setColor(getResources().getColor(android.R.color.black));
    paint.setStrokeWidth(20);

    canvas.drawLine(50, 0, 50, 200, paint);
}
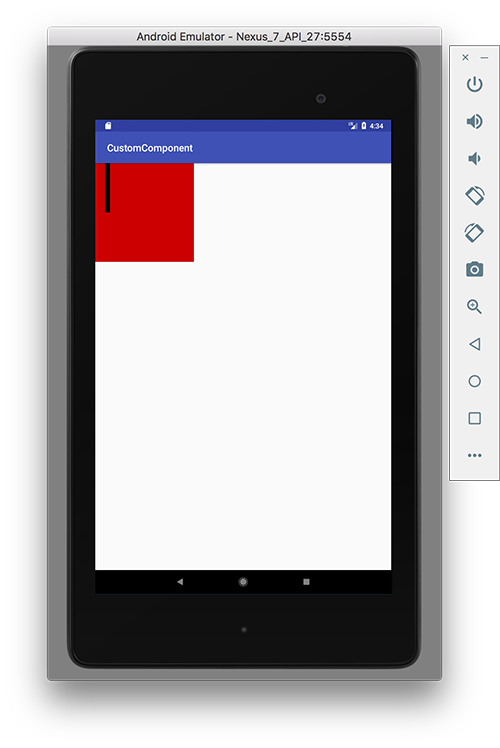
The Paint class allows to set all sorts of drawing properties. In the example above the color is set to black and the stroke width to 20. Next a line is drawn using the Canvas object. The starting point is point (50, 0) and the end point is (50, 200), the resulting line has a width of 200.
As you can see, the component has been given a fixed height and width to make it a bit easier. This is the layout file after the change.
<?xml version="1.0" encoding="utf-8"?>
<LinearLayout xmlns:android="http://schemas.android.com/apk/res/android"
    xmlns:app="http://schemas.android.com/apk/res-auto"
    xmlns:tools="http://schemas.android.com/tools"
    android:layout_width="match_parent"
    android:layout_height="match_parent"
    android:orientation="vertical"
    tools:context="com.eysermans.customcomponent.activities.MainActivity">

    <com.eysermans.customcomponent.components.CustomComponent
        android:background="@android:color/holo_red_dark"
        android:layout_width="200dp"
        android:layout_height="200dp" />

</LinearLayout>
If there is one thing you take away from this post, the next paragraph should be it. Read it carefully.
There is however a problem with this code. You would expect that the line would span the entire height of the component because it has the same height as the component. This is however not the case because the pixel density of the device is more than 1 pixel. The drawLine method does not take the pixel-density of the device into account. To fix this I created a PixelDensityCanvas wrapper class which converts the provided pixels, taking the density of the device into account.
public class PixelDensityCanvas {

    private Resources resources;
    private Canvas canvas;

    public PixelDensityCanvas(Resources resources, Canvas canvas) {
        this.resources = resources;
        this.canvas = canvas;
    }

    public void drawLine(
            float startX,
            float startY,
            float stopX,
            float stopY,
            @NonNull Paint paint) {

        canvas.drawLine(
                convertToDp(startX),
                convertToDp(startY),
                convertToDp(stopX),
                convertToDp(stopY),
                paint);
    }

    public float convertToDp(float pixels) {
        return pixels * getDensity();
    }

    private float getDensity() {
        return resources.getDisplayMetrics().density;
    }
}
The constructor takes two arguments, a Resources object to retrieve the density of the device and a Canvas object to do the actual drawing. The getDensity method determines the density of the device and calculates the correct value. After using the wrapper class the line now spans the entire height of the component.
@Override
protected void onDraw(Canvas canvas) {
    Paint paint = new Paint();
    paint.setColor(getResources().getColor(android.R.color.black));
    paint.setStrokeWidth(20);

    PixelDensityCanvas pdCanvas = new PixelDensityCanvas(getResources(), canvas);
    pdCanvas.drawLine(50, 0, 50,200, paint);
}
![]()
Now let's do some more drawing. What else can the Canvas do?
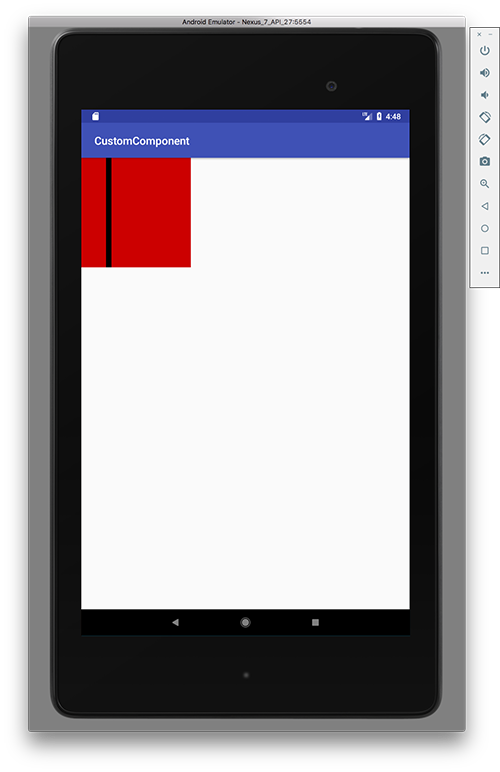
It has a drawCircle method, to make it "density pixel aware" a wrapper method is added to the DensityPixelCanvas class.
public void drawCircle(
        float cx,
        float cy,
        float radius,
        Paint paint)
{
    canvas.drawCircle(convertToDp(cx), convertToDp(cy), convertToDp(radius), paint);
}
The method takes four parameters:
- cx: x value of the center of the circle
- cy: y value of the center of the circle
- radius: radius of the circle
- paint: Paint object to style the circle
Notice that the x and y coordinates are for the center of the circle, keep that in mind while positioning it. Here it's used in the CustomComponent onDraw method
@Override
protected void onDraw(Canvas canvas) {
    Paint paint = new Paint();
    paint.setColor(getResources().getColor(android.R.color.black));

    PixelDensityCanvas pdCanvas = new PixelDensityCanvas(getResources(), canvas);
    pdCanvas.drawCircle(20, 20, 20, paint);
}
The result:
![]()
Next up, drawing a rectangle. There is a drawRect method which, well, draws a rectangle. Let's start with the wrapper method:
public void drawRect(
        float left,
        float top,
        float right,
        float bottom,
        Paint paint) {
    canvas.drawRect(
            convertToDp(left),
            convertToDp(top),
            convertToDp(right),
            convertToDp(bottom),
            paint);
}
And now using it in the onDraw method:
@Override
protected void onDraw(Canvas canvas) {

    Paint paint = new Paint();
    paint.setColor(getResources().getColor(android.R.color.black));

    PixelDensityCanvas pdCanvas = new PixelDensityCanvas(getResources(), canvas);
    pdCanvas.drawRect(10, 10, 100,100, paint);
}
The result:
![]()
Now let's give the rectangle some nice rounded corners. One thing to look out for, the drawRoundedRect method is only available on Android Lollipop and higher, if it's a lower version the method will draw a rectangle without rounded corners.
So the wrapper method:
public  void drawRoundedRect(
        float left,
        float top,
        float right,
        float bottom,
        float cornerRadius,
        Paint paint) {
    if (Build.VERSION.SDK_INT >= Build.VERSION_CODES.LOLLIPOP) {

        canvas.drawRoundRect(
                convertToDp(left),
                convertToDp(top),
                convertToDp(right),
                convertToDp(bottom),
                cornerRadius,
                cornerRadius,
                paint);
    } else {
        drawRect(left, top, right, bottom, paint);
    }
}
Its usage:
@Override
protected void onDraw(Canvas canvas) {

    Paint paint = new Paint();
    paint.setColor(getResources().getColor(android.R.color.black));

    PixelDensityCanvas pdCanvas = new PixelDensityCanvas(getResources(), canvas);
    pdCanvas.drawRoundedRect(10, 10, 100,100, 20, paint);
}
And the result:
![]()
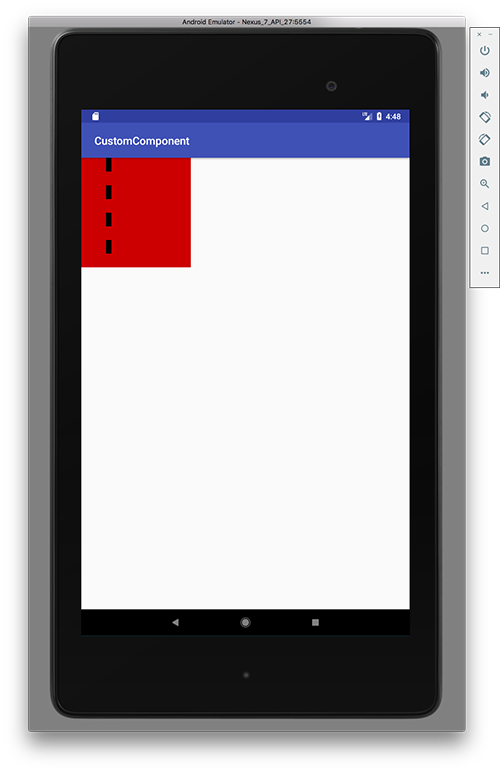
With the Paint object all kind of styling can be applied. For example let's draw a dashed line instead of a full line. No additional method on the PixelDensityCanvas wrapper class needs to be added. The existing drawLine method can be used. The styling can be done via the Paint class.
@Override
protected void onDraw(Canvas canvas) {
    Paint paint = new Paint();
    paint.setColor(getResources().getColor(android.R.color.black));
    paint.setStrokeWidth(20);
    paint.setStyle(Paint.Style.FILL_AND_STROKE);
    paint.setPathEffect(new DashPathEffect(new float[] { 5, 5 }, 0));

    PixelDensityCanvas pdCanvas = new PixelDensityCanvas(getResources(), canvas);
    pdCanvas.drawLine(50, 0, 50,200, paint);
}
But when running this code this is the result:
Well there is pretty fundamental problem. The dashed line, is not dashed. This apparently can happen when hardware acceleration is used. There is more information on this issue. The solution is to turn hardware acceleration off for the custom component with this line of code:
this.setLayerType(View.LAYER_TYPE_SOFTWARE, null);
And now the dashed line is dashed:
Let's end with drawing some text. Quite straightforward actually. The Canvas has a drawText function, so again a wrapper method is added.
public void drawText(String text, float x, float y, Paint paint) {
    canvas.drawText(text, convertToDp(x), convertToDp(y), paint);
}
And the onDraw method.
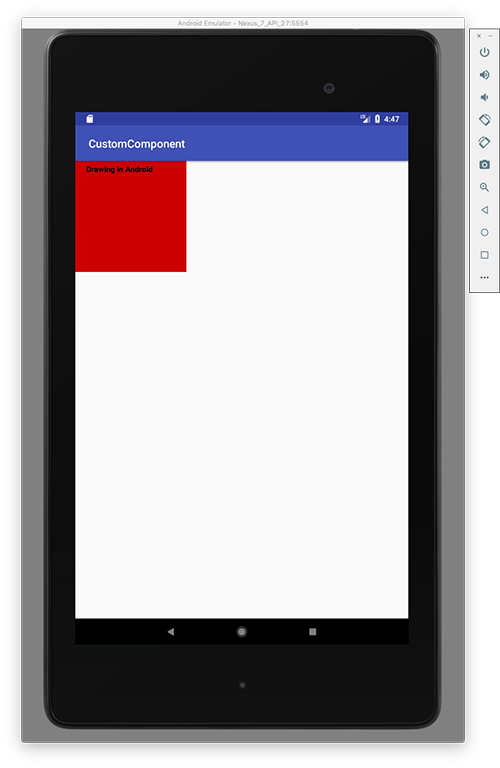
@Override
protected void onDraw(Canvas canvas) {

    PixelDensityCanvas pdCanvas = new PixelDensityCanvas(getResources(), canvas);

    Paint textPaint = new Paint(Paint.ANTI_ALIAS_FLAG);
    textPaint.setColor(getResources().getColor(android.R.color.black));
    textPaint.setTextSize(pdCanvas.convertToDp(14));
    Typeface currentTypeFace = textPaint.getTypeface();
    Typeface bold = Typeface.create(currentTypeFace, Typeface.BOLD);
    textPaint.setTypeface(bold);

    pdCanvas.drawText("Drawing in Android", 20, 20, textPaint);
}
The text can be styled using the Paint object. In this example the color of the text is set to black, the text size is set to 14 and the text is bold. Notice that the text size also has to be recalculated taking the density of the device into account. The ANTI_ALIAS_FLAG is set in the constructor of the Paint object to make the rendering of the text smoother.
That's it, getting started with drawing in Android. The code of this post can be found on Github.